Tuesday, 18 March 2014

Crafty Stick Figures

Hi there,
 I was working on a school project when I made use of some ice cream sticks. I hope you will also enjoy working on this.


Things You Will Need:


  1. Ice-cream stick
  2. Crepe paper sheets. (Different colors)
  3. Chart paper. (White for drawing)
  4. Pencil.
  5. Markers.
  6. Glue.
  7. Clear tape.
  8. Scissors.
  9. Glitter.
  10. Beads.
  11. Tooth pick Stick or Matchstick.

Stick Fairy


INSTRUCTIONS:

How to make the dress:
First measure the crepe paper with your ice cream stick for making the dress of the fairy.I have chosen white for the dress. Now cut  a wide strip of crepe paper. Fan fold the sheet to get the creezes on the dress. At the lower end cut it in a wavy pattern. Now fold the sheet in half(horizontally) to make a real dress like appearance.

How to make the face+arms+wings :

Now draw the face , wings and arms of the fairy on a sheet of white chart paper. Use colors, paints or markers for the detailing. Cut these separately
*Don't forget to check the sizes with your stick.

How to make the fairy wand:
Take a match stick or tooth pick stick and paint it with a glittery color. Add a tiny star or any shape bead on one end. Your wand is ready.
How to assemble:
This part is easy but crucial. Insert your stick under the folds of the dress. rearrange the folds if needed. Take a piece of ribbon and tie the dress on the stick with it.You may use glue or tape for secure joining. Although mine worked fine with the tied ribbon. Now stick the face, wings and arms.Now gently join your wand on any one of the hands. I used a drop of glue.


The Fairy is ready!


Stick Princess


For this I have used red crepe paper instead of white for the dress. Also I added Blue for the corset to give it a changed look. 

Hope you enjoy working on it. Do leave a comment. Feel free to discuss or share about the crafts.
Take Care,
NAZ 

Wednesday, 26 February 2014

CRAFTY PHOTO FRAME

Hey there,
 I have been doing some baking this past week. The more I baked the more I used eggs and of course I got empty egg carton boxes with it. Seriously I saw those boxes and I realize they were too good to waste. So, here I am with a craft using egg cartons.

Requirements :

  1. Egg carton.
  2. Poster Colors / Water Colors.
  3. Scissors.
  4. Glue.
  5. Cardboard.

Process:


Take the egg carton. Separate the cup portion from the lid.


Cut the cups separately and cut like this in the shape of flower.
With a scissors cut wider slits in the cup, it will look like a flower with the petals attached at the center.
Cut some flowers in the shape of narrow slits. (Look in the picture)

 I have cut one cup in thin slits to make the inside whorl of the flower. To make the center part , I used the circles given between the cups in the carton.
This is how you will assemble your flower :

  1. Outer whorl : Large and wide petals.
  2. Middle whorl : Thin and shorter petals.
  3. Inner whorl : Small half circle or you can use beads.
Now is the time to paint our flowers.I have used poster colors here you can use oil colors or spray paints as you like.

Now for the frame:

Take a piece of cardboard or any firm material like the material from which file covers are made. You can cut old files to get it.
Measure the size of your egg tray with the cardboard, leaving at least 5 cm at edges.(for the frame)
By measuring the inside of the tray cut out the piece of card.Now you will have a frame border.(Like this)


With clear glue attach 3 sides of the cardboard to your tray. Leaving one side for inserting photos.
Now take the egg carton flowers and stick those to the frame. You can make whole floral arrangements with it making different size of flowers and using different colors,
Tadah!! The crafty photo frame is ready.

TIP:

If you don't want to use egg tray you can use cardboard for making the whole frame. Just cut 2 pieces of cardboard instead of 1 and make a window like opening in one piece. Then for giving it some volume, attach thin strips of packing sheet along the edges. Glue 3 sides and you will get the frame. Decorate it with the egg flowers.


Please leave a comment if you have any query.
Have a nice day.
NAZ

Sunday, 9 February 2014

Crafty Book Holder

Hey readers,

Has it ever happened to you that you want to showcase your favorite book ? Ever wondered about some fabulous display for a fabulous book with practically NO COST ?

I have devised this SPECIAL CRAFTY BOOK HOLDER for you \(*_*)/ Like our other projects, this project is also extremely low budget so you can try it easily.


You Will Need:

Empty Box.
Craft Paper/ Wrapping paper.
Scissors.
Glue.
Clear Tape.
A Book.

INSTRUCTIONS :

1- Take an empty box and cut it in this shape. 
This is super easy , just mark the edges first then cut it with the help of scissors. Make sure you leave a pocket like shape so the book can be kept inside.


2- Now the decorative part. Wrap it in your favorite color. I have used a red wrap because it's eye catching and the display will look good. For the edges I have used a decorative tape in blue and red.

3- Still it's looking rather dejected so I added flowers on the sides.


 4- The top flower was not looking good so, I removed it and made a tiny book with the help of formic sheet. (I will have a tutorial next time about it)

5- The CRAFTY BOOK HOLDER is now ready !

I hope you will try this. If you have any query regarding any of my crafts just leave me a comment.
Take care,
NAZ 

Monday, 20 January 2014

Crafty Wrapping Paper Storage


Hi there,
Holiday season passed and now you are wondering about where to store all those wrapping papers? I know storing gift wrappers or craft papers can be tricky sometimes. I have devised a special box for this purpose and the awesome thing is "It is super EASY & super CHEAP!" 

Things you will need :
A shoe box , I took for this project.

  1. Box with a lid.( Large shoe box)
  2. Craft paper.
  3. Pen/Marker.
  4. Protractor.
  5. Paper cutter.
  6. Scissors.
  7. Tape.

INSTRUCTIONS :

Take a shoe box or any other box with lid. It should be large enough to hold several rolls of chart papers.
At one side mark several circles of same size with the help of protractor. This size will be your reference size.
Cut out the circles with the help of paper cutter or scissors.
Now it will look like this :

These are the openings for keeping all your gift wraps or craft papers inside the box. Just roll it like small cylinders and then insert inside this. But obviously it is looking so dejected at the moment. So we will wrap it up with a bright colored wrap. See my box below:
And Ta Dah! NO COST! solution for all those gifts wrap you bought in the sale. I hope you will enjoy organizing your wraps in this Crafty way.


I have removed the lid for this shot. You can see the wraps are neatly piled up below and on top layer I have put my craft paper sheets. 
 
Enjoy and take care.
NAZ

Sunday, 19 January 2014

Crafty Flower

CRAFTY FLOWERS


Hi there,
In our last post we discussed about storage boxes and in this post I'll show you how to make a beautiful paper flower.


You will need:

1- Wrapping Paper or craft paper.
2- Scissors.
3- Tape.
4- Stapler.


INSTRUCTIONS :

  • First cut a rectangle from the wrapping paper.
  • Fold it like a fan.
  • Secure the end with staple pin.
  • Cut the upper end in a slight wavy pattern.
  • Slowly open the leaves of the fan , it will form a flower.
  • With clear tape secure the edges.
  • Enjoy! I have used that flower to decorate my storage box. You can also use it to stick on gift box or other things. Do share your views about this post.

Fold it like a fan , than folding it half, staple at one end


Slowly open the fan in a circle and secure the ends with tape.

Flower ; Notice the curvy edges which are due to I cut the edges of the fan in a wavy manner after I pinned it.
Have fun,
NAZ

Tuesday, 14 January 2014

Crafty Storage Box


Hi there,
  I was quite busy these days making my storage boxes presentable. It so happens that I own half a dozen storage boxes and every time I saw those sitting on top of my cupboard I got a bad impression. So, one day I decided let's make them pretty :) And this weekend I was busy wrapping those. I know some of you might come across this situation too so, I am sharing some neat ideas about making your own storage box or decorating an existing one. I will share mine shortly these are the ideas I found quite helpful.


YOU WILL NEED :

  1. Empty cardboard boxes.
  2. Wrapping papers.
  3. Ribbons.
  4. Scissors.
  5. Tape.
  6. Clear glue.

INSTRUCTIONS :
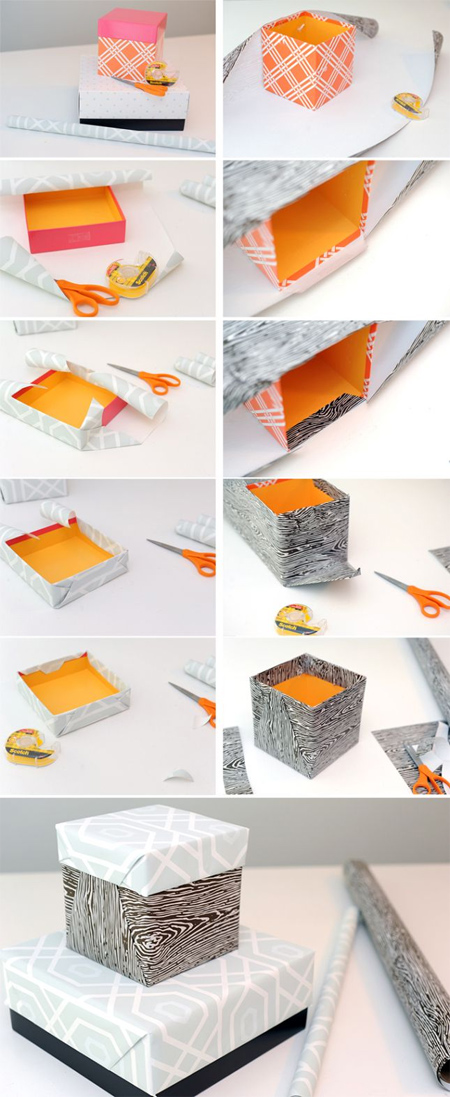
Once you get a storage box/cardboard box. Decide what you gonna put into it. For e.g, You want to put all the festive decorations you have enthusiastically hung all over the house. If your storage box is for the spare decorations, choose a bright cheery wrapping paper for the covering. It will give the boxes a cool touch if you decorate these according to the items you will keep in these.


SAMPLE PICTURES:


FABRIC COVERED STORAGE BOXES


If you have some extra fabric lying around. You can wrap the boxes with it also. And use ribbons or thick strings and add handles too. I will share some sample pictures here which I have found on the internet.

So, quite cool aren't these? I can see there are countless possibilities to decorate our homely looking storage boxes. I will add my boxes tomorrow so stay tuned. :)

Note : I don't own these pictures. I simply found them on the internet and I have shared here so that you will get more ideas. And down is the picture of one of the box I wrapped up as a storage box.

So this is what I did :)

Have fun,
Naz

Friday, 3 January 2014

Crafty Jar

Hello readers,
 Hoping you all are in fit shape and best moods :) So for our first crafty project I have chosen the simplest one.

  CRAFTY JAR


To make this you will need :

  1. Jar
  2. Yarn spools (Any color as in my case I have used Silver, Purple and Yellow).
  3. Glue
  4. Scissors 

STEP 1 :

First with the quantity of the yarn available to you and the size of your jar, think about a pattern .Like I chose 3 broad stripes for my design. You can make the bands narrow if you don't have that much spool of one color or if you have just one color you can wrap it on the whole jar also.
Take the jar and make sure you wipe it's surface with a clean cloth for better adherence of glue and yarn. Spread the glue on the jar. Don't apply it on the whole bottle but, apply first on a little area otherwise your hands will become messy or you might make the spool messy too.Now choose a color of yarn and start wrapping it around the bottle/jar. Wrap till you are satisfied with the length of the band. Note that wrapping needs to be tighten loose wrapping might slip and it will not give neat appearance.


In the second picture you can see I have wrapped 1/3rd portion of the jar. Then cut off the thread end and stick it firmly to the jar.


STEP 2 :

For step choose the second thread and start wrapping it in the same manner like Step1. When you get your desired length. Cut the thread and glue it firmly. And then start wrapping the third one. 

Finish :

As you can see in the end you will have no spool but a pretty jar. Let it dry for 30 minutes or so. As much time as your glue needs. Well although the jar is being wrapped up but if you have some little trinket or flower or stuff. You can stick it on the jar also. Like I used this trinket on mine.

Product finished and you will get this crafty jar.


I hope you enjoyed our first craft. Do share your views about this post.
Take care
NAZ